Tag Archives: toddler food

July is Kohlrabi Month

The monthly challenge for July is Kohlrabi.Kohlrabi

It is so cute the way my daughter (now 27 months old) says “coal-wabby”.  Her enthusiasm for my monthly challenge has really been wonderful.  We use the new fruits or vegetables to do some sensory exploration and talk about different attributes of them, increasing her vocabulary and language skills.

We tried Kohlrabi as chips & pickled.  Homemade chips are a great way for children to experience new vegetables if they are particularly fond of crunchy textures.

Golden Beetroot, Candy Striped Beetroot and Kohlrabii sliced ready for baking into chips
Chips in beautiful winter hues

Pickled in an asian style slaw was perfect for a few different applications
1) in a Vietnamese roll for a variation of a Bahn Mi
2) in Rice paper rolls with oyster sauce flavoured pork mince, bean shoots & fresh coriander

Kohlrabi Cooking: Rice Paper Rolls by Play with Food
Pork Mince, Bean Shoots, Asian Style Slaw & Fresh Coriander


Asian Style Carrot, Beet & Kohlrabi Slaw

Julienne your raw carrot, beetroot & kohlrabi so that they look like matchsticks.  In your bowl, make the pickling juice with the following ratio of ingredients 1 cup water: 2tbsp Caster Sugar: 2tbsp Rice Wine Vinegar: 1tsp Salt.  You will need enough to soak the vegetables in.

I like to let this sit for at least 30 min.  You can do this first and then make your chicken or pork ready to fill your rolls or rice paper rolls.

My toddler was not a fan of the texture of the rice paper roll but loved the pickled slaw.  Making rice paper rolls with a toddler is not a stress free event so I’d recommend saving this for a lazy Saturday afternoon.  Or use it as a mid-week dinner as a bahn mi style on a Vietnamese roll with some marinated chicken pieces and fresh cos lettuce.

Happy Eating!

Simone


June is Artichoke Month

Another Month = Another Challenge!

This month I took on artichoke.  This one was a real curve ball for me as the only time I have ever really used them was from a jar!  A 100g serve of Artichokes from a jar contains 320mg of sodium whereas steaming them fresh (without salt) gives 60mg of sodium. Depending on your total diet though this may not be a significant issue – it’s unlikely we are going to be adding a significant number of artichokes to our diet!  However, if you consider that the National Health and Medical Research Centre suggests we limit salt to 4g/day (1600mg sodium) and the Heart Foundation says 6g/day (2300mg sodium) and the average Australian consumes 8 or 9 times this amount, I think we should be mindful of what salt we add to our diet by using processed foods vs naturally occurring salt.

Now, I’ll jump off my nutritional science podium and chat to you about the main things I learnt during my challenge.

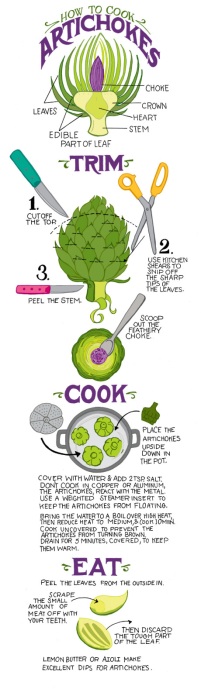
1) Preparing an artichoke is a bit perplexing but you can find awesome infographics on pinterest to help you!

Source of Image:  http://illustratedbites.wordpress.com/2012/10/15/prickly-treat/

How to Prepare and Artichoke

2) Talking about artichokes was a wonderful language building exercise for my toddler.  We looked at pictures of them on the internet and talked about what they may feel like before we went to the shops to choose some to cook.  My daughter was quite the sight walking around the green grocers with her “choke fwowers”. I figured that they did look like flowers and some multi-syllable words are still a bit tricky.  (The artichoke is actually the flower bud harvested before the flower blooms).  The preparatory talks about artichokes, built some excitement about going to the shops.  As you may have seen in my previous post about vegetable exposures away from mealtimes,  I did creatively use going to get the artichokes as a “bribe” to get her off the Peppa Pig coin operated ride and into the green grocer.

image

3) I made an Artichoke, Lemon & Tomato cob loaf with my steamed artichoke hearts that was really yummy and simple. Lemon is in season now & so very fragrant in this bread. I loved it served with some good quality butter, fresh ham & a side salad. The loaf is big enough for a light lunch for 2 adults & 2 kids.
image

Artichoke, Lemon & Tomato Cob Loaf

Ingredients:
1 Artichoke Heart
1 Tomato, Roughly Chopped
Zest from 1/2 Lemon
1/4 cup Parmesan, Finely Grated
2 tbsp Olive Oil
1 1/2 cup Self Raising Flour
1 Egg
Ground Black Pepper, To Taste

To prepare the artichokes, I trimmed it as per the above infographic.  Instead of putting them in the pot with salted water, I used a bamboo steamer and no salt – this worked well and in 20mins I had lovely steamed artichokes.  I tried one with a lemon & pepper yoghurt dipping sauce, which was OK.  I didn’t actually try to get my daughter to try the artichoke like this.  Scraping the flesh away from the leaves with your teeth is interesting but a bit of work for the limited fleshy artichoke that you get.

On my remaining artichoke, I cut away the hard leaves & was left with the heart.  I roughly chopped up the heart & yielded about 1/4 cup of chopped pieces. To the bowl I added the remaining ingredients. My toddler did some stirring & kneading of the bread with me. We put it on a dusted baking tray in the preheated (180oC) oven for about 30mins (until it sounds hollow when you tap on the bottom of the loaf).

image

Do you have a favorite artichoke recipe?
Happy Eating!

April was supposed to be cumquat month

With all good intentions I wrote my monthly challenge list & published it here for everyone to see. My new years resolution was to pick a seasonal fruit or vegetable that I don’t usually use & make a family friendly dish with it.

January was off to a great start with fresh chives. February wasn’t too bad with eggplant. March was a bit more difficult with figs. However, April yielded nothing for cumquats!! I couldn’t find any, let alone develop a recipe I was happy to publish here.

I didn’t want to admit complete defeat so I decided to see how substituting mandarines would be into a recipe I planned on using for cumquats. I made a spice rubbed chicken dish with a mandarin & lemongrass sauce for lunch. It was very loosely based on a Martha Stewart recipe that you can find here. I think I got onto too much of a “substitution” roll & eventually my dish was nothing like Martha’s!

What my toddler did like was using a light rub of ground coriander & turmeric on the chicken thigh (let that sit in the fridge for at least an hour before pan frying it).

The mandarin lemongrass dressing was not loved by my daughter but she did eat rice and chicken that had some lightly drizzled on it. My version cut out lots of the sugar, strained out all of the mandarin and I added a teaspoon of soy sauce. It would make a healthy substitute for a greasy take-away lemon chicken. The citrus pairing with chicken was ok but I know it’s not a pairing we often have in our household.

image
Pan fried chicken thigh, rice & a mandarin lemongrass dressing

On the other hand, a big hit today was my pumpkin & sultana scones. I like to make my scones a bit more moist than most & bake them in a large circular slab. This way you can’t dry them out too much of you leave them to bake too long. You also get wedges of scone which means that you can serve to the size of your appetite. Savoury & sweet scones are great to use up left-overs & then freeze for after school snacks (see my post about afternoon snacks here!)

image
Play with Food : Pumpkin & Sultana Scone

I have been wanting to hone my scone recipe because I think it serves as a great base for some poached fruit & ricotta. I was hoping I could feature a poached cumquat recipe here this month to enjoy with scones. Oh well! If I see them available later on in the season, expect to see a belated post!

Happy Eating!
Simone

Are you on team carrot?

Carrot is stupidly versatile!  I can’t think of a cuisine that doesn’t use carrots in one way or another. However, I have to admit to it being one of my least liked vegetables growing up. Now I am happy to say that I am on “team carrot”.

Last night I made a quick carrot & fennel salad (both chopped raw & topped with juice from one orange + olive oil). We had a fair bit left over. So I decided to try my hand at a roasted carrot, fennel & apple soup for lunch with my toddler.

She went back for seconds!

image

Ingredients:
3 carrots (chopped)
1 fennel bulb (chopped)
Juice from half an orange
Drizzle of olive oil
1 apple (chopped – leave skin on)
500ml vegetable stock
1 clove of garlic (finely chopped)

Method:
Combine first four ingredients & spread out of a baking sheet. Bake in a 180oC oven for 20min. Add the apple to the mixture giving everything a good turn over. Roast for a further 10mins.

Bring vegetable stock to the boil and add the chopped garlic. Add the roasted medley to the stock & simmer for 15min. Puree to get a nice smooth soup with a handheld mixer.

The good thing about this soup is that you could do the roasting in the morning & then the final steps quickly for dinner.

image
Roasted carrots, fennel & apple

I served ours with a slice of multigrain toast.  My daughter loves to dip her toast fingers in soup. She inhaled this soup & went back for seconds. I loved it too!

February is Eggplant Month

At the beginning of the year, I set out a monthly challenge to make dishes from seasonal products and see how my toddler liked them. To see upcoming challenges see my Happy 2014 Post here! The benefits of setting and sharing this challenge include:

1) Eating seasonally is budget and local farmer friendly
2) It stretches my cooking repertoire
3) Seasonal produce goes from farm to fork quicker and is nutritionally better for us!
3) It encourages new food appreciation for my family, especially my toddler.

February is Eggplant Month!

eggplant

Recipe #1: Eggplant Chips

Toddler Review: She sucked the crumbs off and ate mushy inside of the chips – but left the skins behind.

Ingredients & Method:  Sliced one large eggplant and cut into “steak fry” sizes.  Coated with a drizzle of olive oil and then tossed in multi-grain breadcrumbs.  Baked at 150oC for 40mins.

Eggplant Chips served with Hummus

Recipe #2: Burghal & Pork Stuffed Eggplant

Toddler Review: Toddler loved the stuffing mix.  However, was not fussed on eating the actual skin of the eggplant again.

Ingredients & Method: Take 2 Medium sized Eggplants and roast them whole in the oven at 150oC for 1 hour. Remove and let them cool down a bit.  Make up your stuffing mix next by letting 1/3 cup of burghal absorb 2/3 cup of boiling water in a heat proof bowl (takes about 5 min).  In a pan, sautee a diced brown onion in some olive oil.  Once the onion is starting to go transparent, add 200g of pork mince and cook through, add the burghal, 2 tbsp of tomato paste, 1/3 cup of diced caspisum, 1 tsp dried oregano and a handful of chopped fresh basil.  Cook all together for a few minutes until fragrant.  Remove from the heat.  Cut your eggplants in half and remove some of the larger veins of seeds.  Add the flesh of the eggplants to your stuffing mix.  Add an egg to the stuffing mix and combine well.  Put the stuffing mix into the shells of the eggplant and finish with grated cheese.

PlaywithFood-1876Return the stuffed eggplants to the oven for a further 30 min until the stuffing is fully cooked and the cheese is browned. Serve with salad.

PlaywithFood-1-3

Recipe #3: Zucchini and Eggplant Dip 

Toddler Review: “yum”  – my toddler loves dipping sauces though!

Ingredients & Method: Roast 2 medium sized eggplants on 150oC for 1 hour with 1 medium – large size zucchini.  Coarsley chop the zucchini (skin as well) and remove the flesh (including seeds) from the eggplants and put this into a food processor.  Add 1 cup no fat greek yoghurt, a pinch of salt, a pinch of black pepper, 2 tbsp of olive oil, 2 tbsp lemon juice (or juice from 1/2 a lemon) and 2 cloves of garlic crushed.  Blitz in the food processor, spoon into serving dish and then top with an additional drizzle of olive.  We had ours served with some sourdough rolls.  It is also really great chilled and served later.  A great dip to make ahead for a party or BBQ!

PlaywithFood-002

Yum Cha for 4

Today we went to yum cha for the first time as a family of 4. Last week we welcomed Verity to our family. We are getting settled at home & are enjoying getting to know our new bundle of joy.

I sat during yum cha & thought about the experience from my toddler’s point of view. She was loving watching all of the carts circling around the restaurant and the hub bub of the tables around us. She insisted on trying out chopsticks. Firstly, I fed her with them. Then she invented an innovative “one stick and one hand” technique. She loved the rice parcels in pandan leaf, sesame encrusted prawn roll, snake beans and black pepper beef.
image

I thought that if you are looking for a way of having family style meals when dining out and if Yum Cha is an option for you – give it a go! There are lots of learning opportunities and topics for fact based food conversations.

For more information about some simple steps to introducing the family meal see this post of mine.

Inspired Cereal Bars

A US blog that I follow, Super Healthy Kids, posted a version of a healthy cereal bar.  Inspired, I went to our local supermarket to investigate our Aussie equivalent (fruit filled bars / K-Time bars) and I agreed that there is much to be said about lengthy ingredient lists with lots of numbers in them.  So, I decided to take some of the advice from the comments on their blog & create an Aussie version of this cereal bar.

Rolled out dough with cherry & choc filling alongside

I decided that I wanted to use some fresh seasonal fruit and make sure the filling was thick so I didn’t have problems filling the parcels.  I opted for a dairy-free cherry & chocolate filling.  You could add coconut essence or desiccated coconut if you wanted a “cherry ripe” type of flavour too.

My toddler loved these bars.  However, I did make them the typical cereal bar size which is still a bit big for her.  Next time, I would make fun-size versions.  The size of the food you offer to your children is really important.  Their first sensory input can be sight.  They see something and immediately start motor planning how they are going to approach it. If they decide the motor planning task is too much for them to handle, the food will be resisted.

Adding the filling
Adding the filling
The rolled up bar ready for the oven

Cherry and Chocolate Cereal Bars (makes 7 bars)

Cereal Bar Dough:

  • 1/3 cup coconut oil
  • 1/3 cup honey
  • 1 egg
  • 1/2 tsp vanilla bean paste
  • 2 cups wholemeal flour
  • 1 tsp baking powder
  • 1/4 tsp salt
  • 1/3 cup natural bran

Filling:

  • 1 cup deseeded & chopped fresh cherries
  • 1/2 cup dates
  • 2 tbsp cocoa powder

Preheat your oven to 180oC and line a baking tray with baking paper.  Boil the kettle. Soak your fresh cherries and dates together in boiled water. Use a plastic bowl for soaking as you have to puree them later.  In the meantime, in one bowl, combine the honey and coconut oil (you may need to melt the coconut oil if it is not already liquid) and then add the egg and vanilla bean paste.  In another bowl, mix together the dry ingredients and then add the wet ingredients to it.  Work the dough into a ball with your hands. Roll the dough out until it is 1/2 cm thick and cut into 9 cm x 9 cm squares – you should get 7 squares.  Note: It is best to work with this dough fresh as it will crumble more if left to dry out for too long.

Drain your dates and cherries and puree with a hand stick blender.  Add the cocoa powder – taste the mixture now to make sure it has the balance you like.  You may want to add some honey for extra sweetness or extra cocoa for bitterness.

To each square add about 2 tablespoons of mixture along one side and then fold the dough over.  You may notice a little bit of cracking.  Smooth it over if you want, however, these bars do look “rustic” (even the commercial bars have little cracks in them).

Place them on your lined tray and into the oven for 15mins.  These should keep well at ambient temperatures & stay soft in an airtight container for up to 3 days or refrigerate if you want to store them for up to 1 week.

The finished product - Cherry Choc Cereal Bars
The finished product – Cherry Choc Cereal Bars

HAPPY EATING!

Simone Emery